I use my home Synology NAS to consolidate nearly all my data in one place. One exception to this is my PlayStation 4, which can connect to the NAS to consume media, but not to store games or backups. As my console’s hard drive quickly filled up, I had considered taking advantage of the PlayStation’s external hard drive support. This, however, would completely ignore the eager terabytes of available storage sitting just a few feet away in my NAS.
As an aside, I am aware that other NAS manufacturers such as QNAP offer support for direct USB storage. While that would likely solve this issue out of the box, it kind of takes the fun out of things 🤷♂.
I figured if the PlayStation can connect to a USB hard drive, maybe I could emulate a USB storage device that would bridge the gap to my NAS. This would also allow for this solution to be applied to any USB storage compatible device including other consoles, PVRs, or other devices not equipped to interact with network storage.
Luckily, the Linux kernel supports USB Gadgets that, with the help of USB On-The-Go (OTG), can emulate several devices including HIDs, NICs, and of course mass storage.
Before the release of the 4b, the only Raspberry Pi hardware that supported USB On-The-Go were the Zero, Zero W, A, and A+. I had a spare Zero W laying around so I started with a small test. With the help of this guide, I was able to set up the mass storage gadget with an image file on the SD card. The performance was abysmal, but it showed promise for the concept.
The mass storage gadget expects a block storage device, so I would not be able to connect it to my NAS using a network share over NFS, SMB, etc. Instead, I used an iSCSI LUN that I setup using the Synology iSCSI Manager and connected to the Pi with the open-iscsi package.
It seemed to work without a hitch, but the performance was just as bad as before. This is primarily due to hardware limitations of the shared data bus on the Zero W. Around this time, Raspberry Pi had released the 4b with OTG, so I figured it was worth another shot on the improved hardware.
Here’s how I did it…
Method
Step 1: Install Raspbian
Step 2: Enable SSH and optionally WiFi
Step 3: Install the open-iscsi package
apt-get update
apt-get install open-iscsi
Step 4: Initiate an iSCSI connection
You will first have to run a discovery against your iSCSI server.
iscsiadm -m discovery -t st -p SERVER-IP
Take note of the target name you wish to use, and initiate a connection to it.
iscsiadm -m node --targetname "TARGET-NAME" --portal "SERVER-IP:3260" --login
This will add a new device to your system, usually something like /dev/sdX . You can use tail -f /var/log/messages to help find the device name.
Step 5: Setup the mass storage gadget
First, enable the OTG modules as per the guide mentioned earlier.
echo "dtoverlay=dwc2" | sudo tee -a /boot/config.txt
echo "dwc2" | sudo tee -a /etc/modules
echo "g_mass_storage" | sudo tee -a /etc/modules
Now enable the mass storage gadget using the new device from the previous step.
modprobe g_mass_storage file=/dev/sdX stall=0
Step 6: Connect to a device
Now, without disconnecting power, you should be able to connect your Pi to any devices via the OTG port. If everything worked, it should be detected as an uninitialized storage device. You can now format it and use it like any other USB storage device.
Results
Unfortunately, the results aren’t much better than my previous attempt with the Zero W. With the new hardware I am getting a dedicated GbE connection, but I am still limited by the USB 2.0 OTG interface.
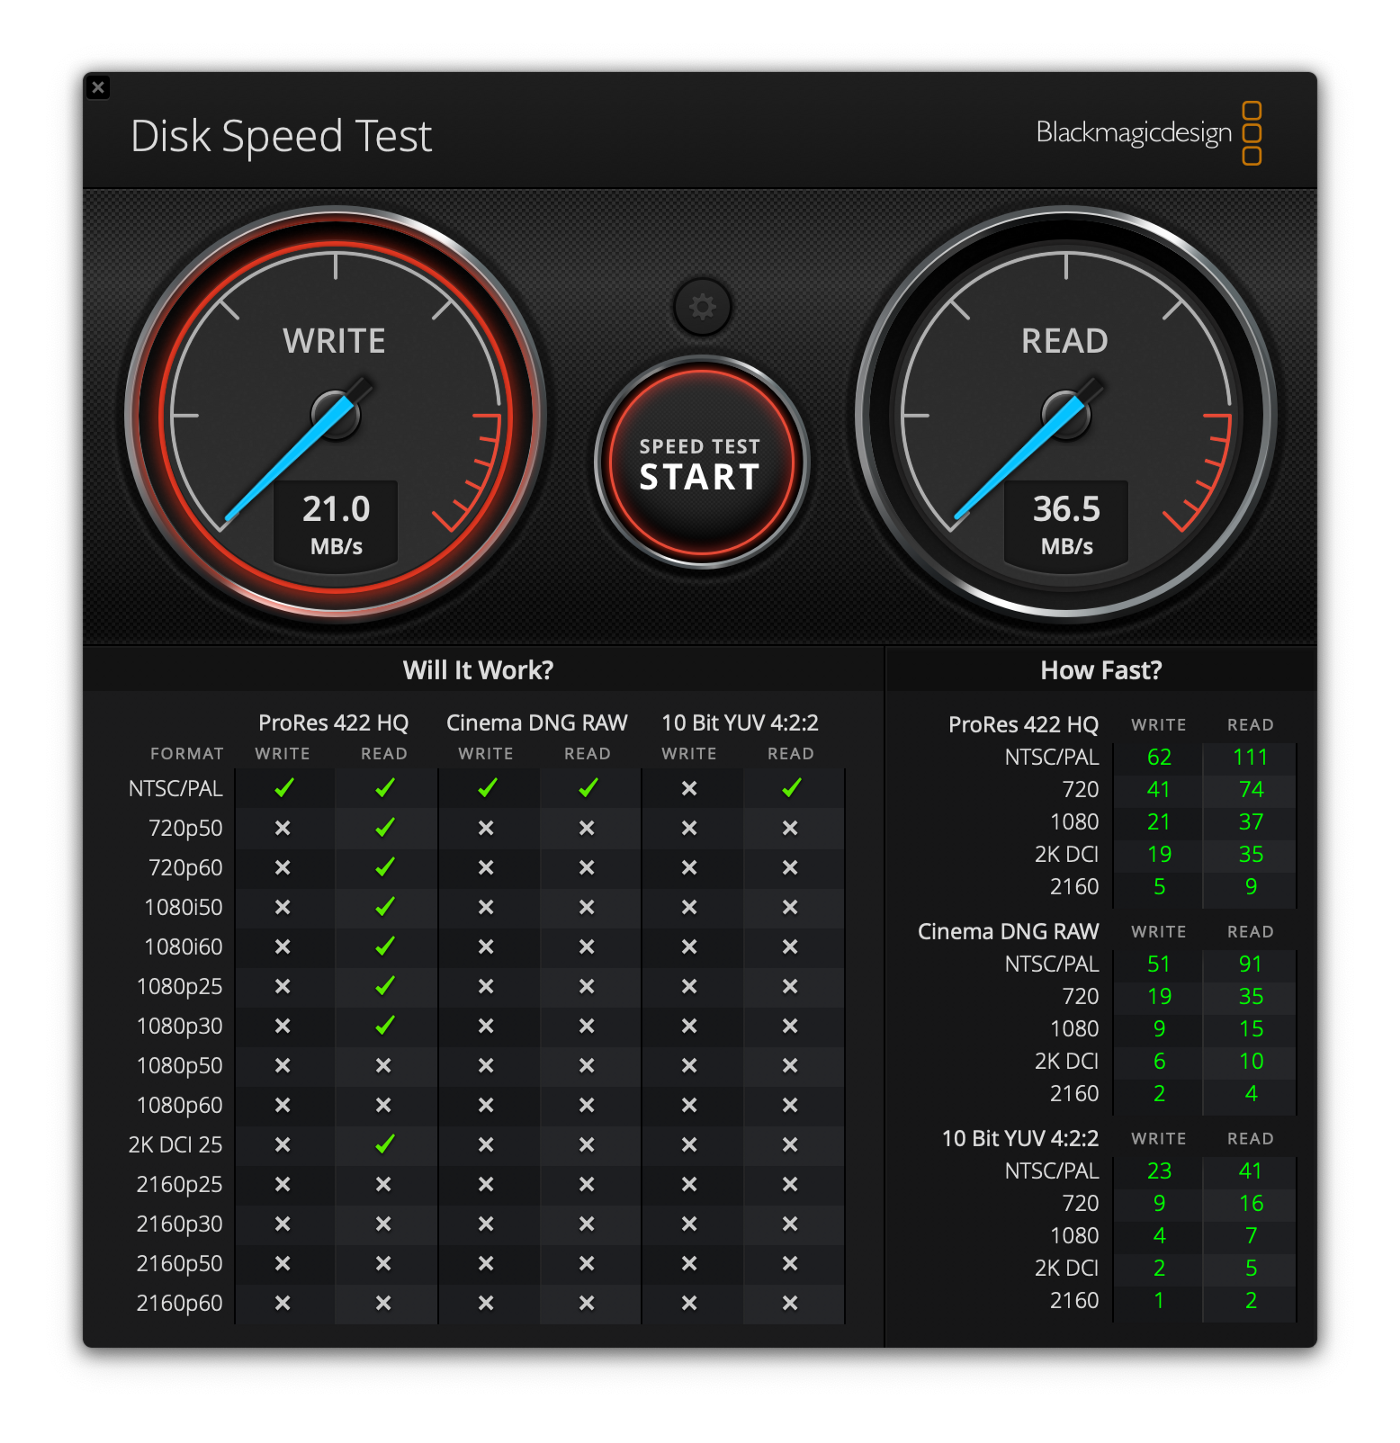
Blackmagic Disk Speed Test of the piSCSI over a USB-C cable
As a point of comparison, here is the performance when the iSCSI is mounted and tested locally on the Pi.
pi@raspberrypi:~/exfat $ sync; dd if=/dev/zero of=tempfile bs=1M count=1024; sync
1024+0 records in
1024+0 records out
1073741824 bytes (1.1 GB, 1.0 GiB) copied, 9.64351 s, 111 MB/s
pi@raspberrypi:~/exfat $ dd if=tempfile of=/dev/null bs=1M count=1024
1024+0 records in
1024+0 records out
1073741824 bytes (1.1 GB, 1.0 GiB) copied, 1.5093 s, 711 MB/s
pi@raspberrypi:~/exfat $ sudo /sbin/sysctl -w vm.drop_caches=3
vm.drop_caches = 3
pi@raspberrypi:~/exfat $ dd if=tempfile of=/dev/null bs=1M count=1024
1024+0 records in
1024+0 records out
1073741824 bytes (1.1 GB, 1.0 GiB) copied, 18.5665 s, 57.8 MB/s
There is a lot of performance potential here, but the limiting factor is the connection to the host device over USB 2.0.
Another issue is that the PlayStation will not accept it as a storage destination for games because it requires a USB3.0 drive. Bummer.
Next Steps
A big pain point in this process is having to set up all the connections again if the Pi loses power or is shutdown. Ideally, there would be a script that is run on startup so that the setup can be run without intervention. This would also allow for the device to be powered over OTG upon connection to the host.
As for the device limitations, I have put an order in for a RockPi 4b, which boasts an OTG interface with USB 3.0 support. I will post an update with the results of that device once I have received it.
Update: My follow up to this is now out!