My wife and I recently started playing Cities: Skylines together with a multiplayer mod, but her older MacBook Pro wasn’t powerful enough, causing the server to throttle my game to allow hers to catch up. With the ongoing chip shortage and crypto boom, buying new hardware to remedy this issue was off the table. Instead, I opted to share my existing hardware through virtualization using Proxmox Virtual Environment and GPU passthrough.
There are many guides online for how to do GPU passthrough with virtual machines, but I found they were mostly copy-paste guides with very little explanation as to what the commands and configuration does. While I am far from an expert on this topic, I have tried to offer some explanations and resources for the steps I followed during my process.
Host Configuration
This guide assumes you already have Proxmox installed, along with any GPUs that you wish to pass through to a guest VM. In my case I pass through two GPUs, one each for my wife and me, leaving no video out for the Proxmox host.
IOMMU
When visualizing, guests are not aware of the mapping between their memory space and host memory, meaning that when the guest performs direct memory access (DMA), the I/O device will be instructed to access host memory with a guest address. Input-output memory management unit (IOMMU) is a hardware feature that can perform the mapping from guest-physical addresses to host-physical addresses, allowing a guest to perform DMA.
IOMMU is essential to this process and must be enabled in the BIOS. The name for this feature in the BIOS differs but is generally referred to as AMD-Vi for AMD CPUs, or Virtualization Technology for Directed I/O (VT-d) for Intel CPUs.
Once IOMMU is enabled in the BIOS, it must also be enabled in the Linux kernel through kernel parameters that can be configured in the GRUB bootloader configuration. Open /etc/default/grub and add the following parameters to the GRUB_CMDLINE_LINUX_DEFAULT line:
amd_iommu=onenables IOMMU for AMD CPUs orintel_iommu=onfor Intel CPUspcie_acs_override=downstream,multifunctionsplits up the IOMMU groups more aggressively for more granular passthroughvideo=efifb:offdisables the EFI framebuffer, which resolved a BAR reservation issue (BAR 0: can't reserve)
After adding these parameters, my GRUB_CMDLINE_LINUX_DEFAULT looked like this:
GRUB_CMDLINE_LINUX_DEFAULT="quiet amd_iommu=on pcie_acs_override=downstream,multifunction video=efifb:off"
For these changes to take effect, update the bootloader by running update-grub.
Drivers
By default, the host will load the graphics driver for any GPU it detects, and attempt to initialize it. While this would normally be helpful when using a GPU on the host, it prevents the device from being initialized in a guest VM. This can be prevented by blacklisting the graphics drivers so that the kernel will not load them by adding the following lines to /etc/modprobe.d/blacklist.conf:
blacklist radeon
blacklist nouveau
blacklist nvidia
VFIO
Virtual Function I/O (VFIO) is a userspace driver framework that allows direct device access. In this application, it allows high performance and low overhead access to the GPU. To enable VFIO during kernel boot, you need to enable the kernel modules by adding the following lines to /etc/modules:
vfio
vfio_iommu_type1
vfio_pci
vfio_virqfd
Next, the PCI vendor and device IDs are required to configure the vfio_pci module so that it can reserve the devices for passthrough. lspci is a tool for listing PCI devices, and will return the <bus>:<slot>.<function> IDs for each.
root@pve:~# lspci
[...]
05:00.0 VGA compatible controller: NVIDIA Corporation GK104 [GeForce GTX 760] (rev a1)
05:00.1 Audio device: NVIDIA Corporation GK104 HDMI Audio Controller (rev a1)
[...]
0b:00.0 VGA compatible controller: Advanced Micro Devices, Inc. [AMD/ATI] Fiji [Radeon R9 FURY / NANO Series] (rev c8)
0b:00.1 Audio device: Advanced Micro Devices, Inc. [AMD/ATI] Fiji HDMI/DP Audio [Radeon R9 Nano / FURY/FURY X]
[...]
In the abbreviated output above I have two GPUs an Nvidia GTX 760 (05:00) and an AMD Radeon R9 FURY X (0b:00). Notice that each GPU has two functions, one for the VGA controller and another for the built-in audio device. Use lspci -n -s <bus>:<slot> to get the vendor and device ID for each device.
root@pve:~# lspci -n -s 05:00
05:00.0 0300: 10de:1187 (rev a1)
05:00.1 0403: 10de:0e0a (rev a1)
root@pve:~# lspci -n -s 0b:00
0b:00.0 0300: 1002:7300 (rev c8)
0b:00.1 0403: 1002:aae8
Edit or create the file /etc/modprobe.d/vfio.conf and add the following line, substituting my IDs for your comma-separated list of the GPUs you wish to pass through.
options vfio-pci ids=10de:1187,10de:0e0a,1002:7300,1002:aae8 disable_vga=1
Finally, update the initial ramdisk so that these configuration changes can be used by the kernel at boot, then reboot your host.
update-initramfs -u
Guest Configuration
It is finally time to create virtual machines. I recommend following the Proxmox wiki for Windows 10 best practices as a starting point, but modifications are required for better compatibility.
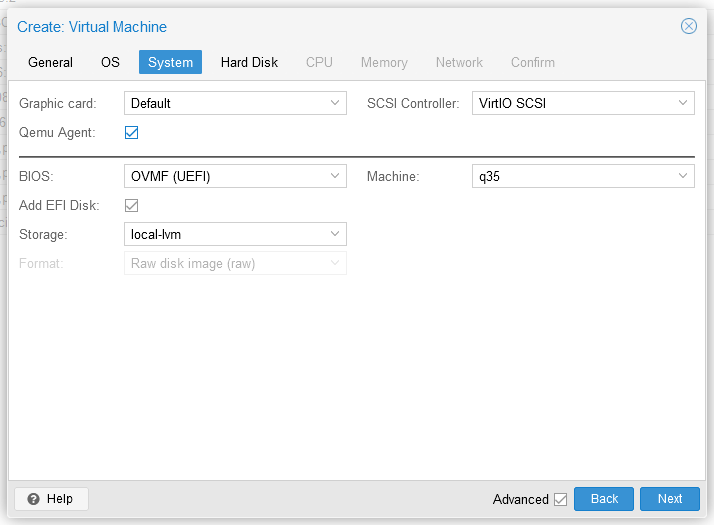
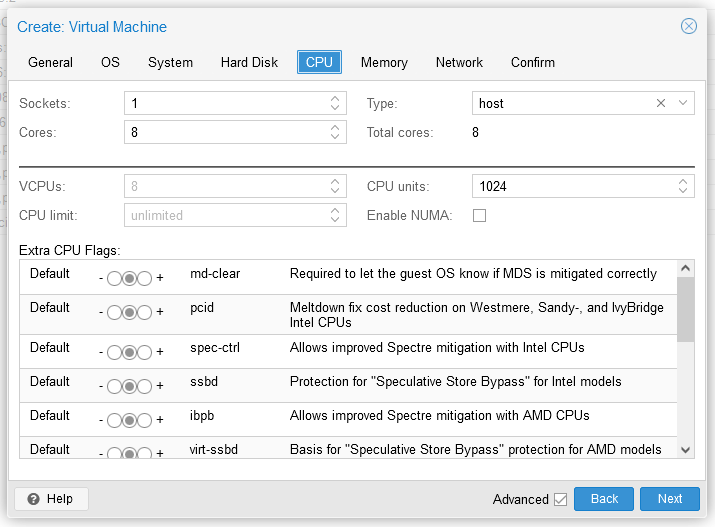
During the virtual machine creation, under the System tab, set the machine type to q35, and the BIOS to OVMF (UEFI). An EFI disk should also be added when changing your BIOS type. Then in the CPU tab, set the Type to host.
Perform the Windows install as usual. After the install, I highly recommend enabling RDP as the VNC console in Proxmox will not work once the GPU is passed through.
Shutdown the VM, and go to its Hardware tab in the Proxmox web UI. Add a new PCI Device, select the bus ID of the GPU you want to pass through to this guest, and check all the boxes (more information here). Note that the All Functions checkbox passes through all PCI functions for the device, which includes the built-in audio device. There is no need to pass that through separately.

Your VM should be ready to go. Ensure your monitor is attached directly to the GPU you passed through and start the VM. For reference, this was my final VM configuration.
agent: 1
balloon: 0
bios: ovmf
boot: order=scsi0
cores: 8
cpu: host
efidisk0: local-lvm:vm-101-disk-1,size=4M
hostpci0: 0b:00,pcie=1,x-vga=1
machine: pc-q35-5.2
memory: 16384
name: myvm
net0: virtio=3A:E0:E6:77:D6:DD,bridge=vmbr0,firewall=1
numa: 0
ostype: win10
scsi0: local-lvm:vm-101-disk-0,backup=0,cache=writeback,discard=on,size=256G,ssd=1
scsihw: virtio-scsi-pci
smbios1: uuid=ad6efb1d-ad9a-4d30-b838-b5e196feb451
sockets: 1
vmgenid: 02e96114-94ed-4c18-b726-4bde08116748
Issues
From this point forward, your guest should act exactly like a bare metal install. You will need to install the Windows graphics drivers for your GPU. I did run into some issues that are worth mentioning.
Nvidia drivers R465 and later should have virtualization support for GPUs from Kepler onward. Before this announcement, the Nvidia driver would fail to initialize the card if it detected it was in a virtualized environment. This is a relatively new development as of writing this guide, so if you encounter the dreaded Code 43 error, ensure that your GPU and drivers are compatible with virtualization.
Some AMD cards also have a quirk where they cannot be reset after being first initialized by a guest. That means that after restarting the guest, the card will fail to initialize again unless the host is also restarted. This quirk may be handled by kernel PCI quirks or by several third-party fixes, but it seems that the Radeon R9 FURY X I am using has fallen through the cracks. As of writing this guide, I need to reboot my Proxmox instance any time the guest needs to restart.
Performance
There are far more comprehensive performance analyses out there, but I wanted to put together a few tests to ensure I am not leaving much performance on the table. Below I have three configurations: a bare-metal install of Windows, a single VM with all resources allocated to it, and a dual VM setup running the benchmarks concurrently with the resources split equally between them.
The hardware I am using is an AMD Ryzen 7 3700x 8-core/16-thread processor with 32GB of DDR4 memory at 3200MHz C16. The values are reported from the machine using the AMD Radeon R9 FURY X.
Each configuration is run through three benchmarks: Unigine Heaven 4.0 at 1080p (DirectX 11, Ultra Quality, Extreme Tessellation, and 8x Anti-aliasing), Cinebench R23 multicore, and Cinebench R23 single core.
| Heaven | Cinebench (MC) | Cinebench R23 (SC) | |
|---|---|---|---|
| Bare-metal | 1755 | 10787 | 1257 |
| Single VM | 1694 | 11410 | 1260 |
| Dual VMs | 1741 | 5521 | 1194 |
There is very little difference between the bare-metal and single VM configuration performance, but when two VMs are stressing the hardware concurrently, there are some expected shortcomings. As the CPU and memory are cut in half to share them equally between the VMs, the Cinebench multicore test showed almost exactly a 50% drop-off in performance making it comparable to an Intel i7-7700K. Fortunately, the single core performance seems to only be minimally impacted, and GPUs that are almost entirely isolated seem to have no noticeable impact.