Over the holidays, I wanted to build a Kubernetes cluster on some Raspberry Pis I had, which were collecting dust. I spun up a simple Rancher K3s cluster, but quickly discovered they were heavily IO-bound. I decided that if I was going to use this cluster for real applications, I would need a better storage solution.
IO performance is the primary issue keeping me from using Raspberry Pis in more of my projects. Even on the latest hardware (4B at the time of writing), with the best SD cards, most buffered reads cap out around 40MB/sec. In addition to poor performance, SD cards tend to become corrupt and have a finite number of write cycles.
There are many ways around using the SD card for storage on the Raspberry Pi, including booting from USB (M.2, SSD, HDD, etc.) or over the network with NFS as a root partition. I didn’t want to buy additional storage media or adapters, so I settled on using network storage so that I could leverage my Synology DS918+ NAS. Unfortunately, NFS is not supported by Docker’s storage drivers, so I decided to use iSCSI. In addition to it being a block device, it offers far better performance and allows me to use more advanced features such as snapshots.
Initially, I tried Berryboot’s built-in iSCSI support which, with the help of the BerryServer images, was incredibly easy to setup. However, after the install, I discovered that this solution, like NFS, does not currently support Docker. I also tried out the PFTP UEFI firmware which supports iSCSI, but I struggled to get bootable Ubuntu installation on network storage, and later found out that there is currently no iSCSI support for the Raspberry Pi 3.
Eventually, I stumbled into this guide for Raspbian on the Raspberry Pi 3, which I was able to adapt to my needs.
Instructions
I assume that you already have Ubuntu 20.04.1 installed on a compatible Raspberry Pi with root shell (#) access and a configured iSCSI target with a mapped LUN.
While following this guide you will need to replace the following values with your own.
<YOUR_TARGET_IP>is the IP of your iSCSI server (e.g.192.168.0.100).<YOUR_TARGET_NAME>is the iSCSI Qualified Name (IQN) of your iSCSI target (e.g.iqn.2000-01.com.synology:nas.Target-1.d3642d59a9).<YOUR_INITIATOR_NAME>is an IQN you define for your Raspberry Pi (e.g.iqn.1993-08.org.debian:01:d6bb1f56c07). This can be anything as long as it is in IQN format.<YOUR_DEV_FILE>is the device file for the connected iSCSI LUN (e.g./dev/sda). This will be defined later.<YOUR_DEV_UUID>is the UUID for the connected iSCSI LUN (e.g.6d63abc4-c64e-43ad-b1b1-15433e030fcb). This will be defined later.
Before starting, ensure you have fully updated your install. I ran into several problems during this process that were resolved by simply having the latest packages and kernel.
# apt update && apt -y full-upgrade && apt -y autoremove
# reboot
Ensure the open-iscsi package and start the service, though this was already done on my version of Ubuntu.
# apt install open-iscsi
# systemctl start open-iscsi
Discover and login to the desired iSCSI targets to connect the LUN.
# iscsiadm --mode discovery --type sendtargets --portal <YOUR_TARGET_IP>
# iscsiadm --mode node --targetname <YOUR_TARGET_NAME> --portal <YOUR_TARGET_IP> --login
The iSCSI LUN should now be connected, so we will use fdisk to determine its block device file. This defines <YOUR_DEV_FILE>, in this case /dev/sda.
# fdisk -l
...
Disk /dev/sda: 64 GiB, 68719476736 bytes, 134217728 sectors
Disk model: iSCSI Storage
Units: sectors of 1 * 512 = 512 bytes
Sector size (logical/physical): 512 bytes / 512 bytes
I/O size (minimum/optimal): 512 bytes / 512 bytes
We also need the UUID for the new device, which we will get with blkid. This defines <YOUR_DEV_UUID>, in this case 6d63abc4-c64e-43ad-b1b1-15433e030fcb.
# blkid <YOUR_DEV_FILE>
/dev/sda: UUID="6d63abc4-c64e-43ad-b1b1-15433e030fcb" TYPE="ext4"
Enable the iSCSI module as part of the initial ramdisk, which will be used during boot to mount the root partition, then update the initial ramdisk.
# touch /etc/iscsi/iscsi.initramfs
# update-initramfs -v -k $(uname -r) -c
Create the filesystem on the new device and mount it. Then selectively sync the current root filesystem to the new root filesystem and create empty directories for the things we didn’t sync.
# mkfs.ext4 <YOUR_DEV_FILE>
# mount <YOUR_DEV_FILE> /mnt
# rsync -avhP --exclude /boot/firmware --exclude /proc --exclude /sys --exclude /dev --exclude /mnt / /mnt/
# mkdir /mnt/{dev,proc,sys,boot/firmware,mnt}
Update mount configuration for the new root partition in /mnt/etc/fstab by replacing the existing root (/) line with the following.
UUID=<YOUR_DEV_UUID> / ext4 defaults 1 1
Finally, we need to update the /boot/firmware/cmdline.txt so that we boot with the new root partition. Remove the old root definition, root=LABEL=writable, and add the following to the end of the line.
ip=dhcp root=UUID=<YOUR_DEV_UUID> ISCSI_INITIATOR=<YOUR_INITIATOR_NAME> ISCSI_TARGET_NAME=<YOUR_TARGET_NAME> ISCSI_TARGET_IP=<YOUR_TARGET_IP> ISCSI_TARGET_PORT=3260 rw
For me, my /boot/firmware/cmdline.txt looked something like this (example values used).
# cat /boot/firmware/cmdline.txt
net.ifnames=0 dwc_otg.lpm_enable=0 console=serial0,115200 console=tty1 rootfstype=ext4 elevator=deadline rootwait fixrtc ip=dhcp root=UUID=6d63abc4-c64e-43ad-b1b1-15433e030fcb ISCSI_INITIATOR=iqn.1993-08.org.debian:01:d6bb1f56c07 ISCSI_TARGET_NAME=iqn.2000-01.com.synology:nas.Target-1.d3642d59a9 ISCSI_TARGET_IP=192.168.0.100 ISCSI_TARGET_PORT=3260 rw
Now we can unmount the new root filesystem and reboot. If everything worked as expected, it should reboot onto the iSCSI root.
# umount /mnt
# reboot
Results
I wanted the results to be easily comparable, so I used the same benchmarking methods Jeff Geerling used for the Pi Dramble project. The following commands were used on the same installation, before and after the iSCSI root setup.
# hdparm -t </dev/mmcblk0 OR /dev/sda>
# dd if=/dev/zero of=/tmp/test bs=8k count=50k conv=fsync
# iozone -e -I -a -s 100M -r 4k -i 0 -i 1 -i 2
For my baseline, I used a SanDisk Ultra 16GB SD card. I tested both the iSCSI and SD card on a Raspberry Pi 4B (4GB) and a 3B+.
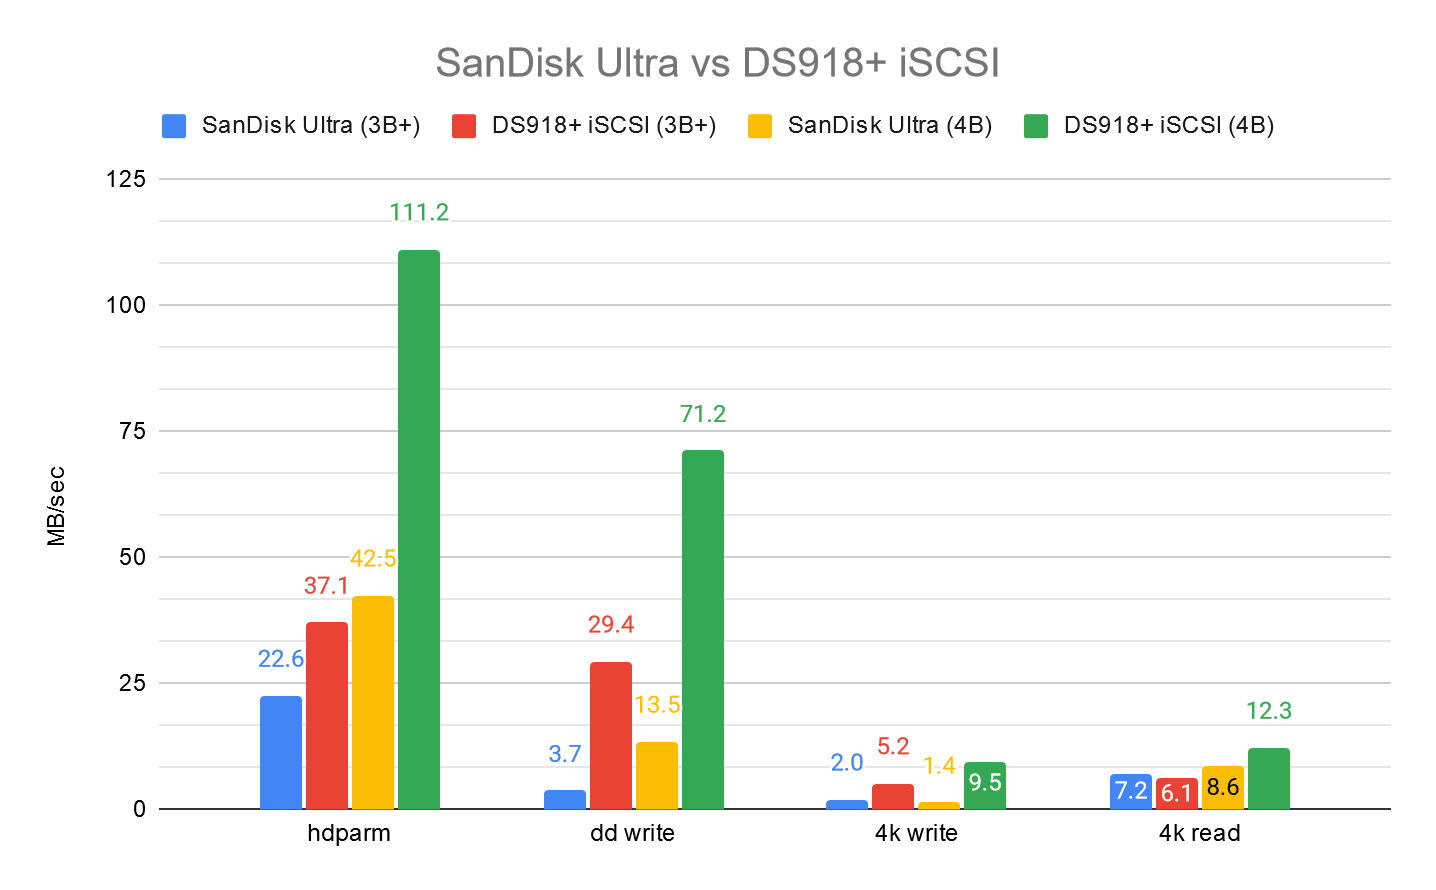
The iSCSI root performs significantly better than the SD card, has a much better resiliency to corruption, and offers many powerful features such as snapshots and an NVMe read-cache. The only notable drawback is the additional network and IO load that multiple contending Pis would create.